Workload-based Web Application Firewall (WAF)
This feature is tech preview. Tech preview features may be subject to significant changes before they become GA.
Big picture
Protect cloud-native applications from application layer attacks with Calico Enterprise Workload-based Web Application Firewall (WAF).
Value
A web application firewall (WAF) protects web applications from a variety of application layer attacks such as cross-site scripting (XSS), SQL injection, and cookie poisoning, among others. Given that attacks on apps are the leading cause of breaches, you need to protect the HTTP traffic that provides a gateway to valuable app data.
Historically, web application firewalls (WAFs) were deployed at the edge of your cluster to filter incoming traffic. Our workload-based WAF solution takes a unique, cloud-native approach to web security by allowing you to implement zero-trust rules for workloads inside your cluster.
Calico Enterprise WAF allows you to selectively run service traffic within your cluster, and protect intra-cluster traffic from common HTTP-layer attacks such as SQL injection, and cross-site request forgery. To increase protection, you can use Calico Enterprise network policies to enforce security controls on selected pods on the host.
In addition to protecting against application layer attacks, any blocked HTTP requests are logged and available in Elasticsearch for review. You can also create global alerts based on these logs.
Concepts
About Calico Enterprise WAF
WAF is deployed in your cluster as an Envoy DaemonSet. Calico Enterprise proxies selected service traffic through Envoy, checking HTTP requests using the industry-standard ModSecurity module. To view the rule set that is bundled with WAF, see rule-set.
You simply enable WAF in Manager UI, and determine the services that you want to enable for WAF protection. You can view WAF events as HTTP logs in Service Graph and Kibana. And you can set up global alerts to get notifications on the Alerts page.
Before you begin
Not supported
- GKE
Limitations
WAF cannot be used with:
- Host-networked client pods
- TLS traffic
- LoadBalancer services
- Egress gateways
- WireGuard on AKS or EKS (unless you apply a specific kernel variable). Contact Support for help.
When selecting and deselecting traffic for WAF, active connections may be disrupted.
Enabling WAF for certain system services may result in an undesired cluster state.
Do not enable WAF for system service with the following prefixes:
tigera-*calico-*kube-systemopenshift-*
Do not enable WAF for system services with the following combination of name and namespaces:
- name:
kubernetes, namespace:default - name:
openshift, namespace:default - name:
gatekeeper-webhook-service, namespace:gatekeeper-system
- name:
Prerequisites
Enable the Policy Sync API in Felix
If you intend to enable WAF using the CLI rather than in Manager UI, or you have not yet
configured L7 logs, you must enable the Policy Sync API in Felix. To do this cluster-wide,
modify the default FelixConfiguration to set the field policySyncPathPrefix to /var/run/nodeagent:
kubectl patch felixconfiguration default --type='merge' -p '{"spec":{"policySyncPathPrefix":"/var/run/nodeagent"}}'
(Optional) Deploy a sample application
If you don’t have an application to test WAF with or don’t want to use it right away against your own application, we recommend that you install the GoogleCloudPlatform/microservices-demo app:
kubectl apply -f https://raw.githubusercontent.com/GoogleCloudPlatform/microservices-demo/release/v0.7.0/release/kubernetes-manifests.yaml
How to
- Enable WAF on your cluster
- Apply WAF to your services
- View WAF events
- Create global alerts
- Disable WAF feature from your cluster
Enable WAF on your cluster
Enabling WAF is a one-time activity. You can enable it either through UI or CLIs.
On the Manager UI, click Threat Defense, Web Application Firewall, Configure Web Application Firewall.
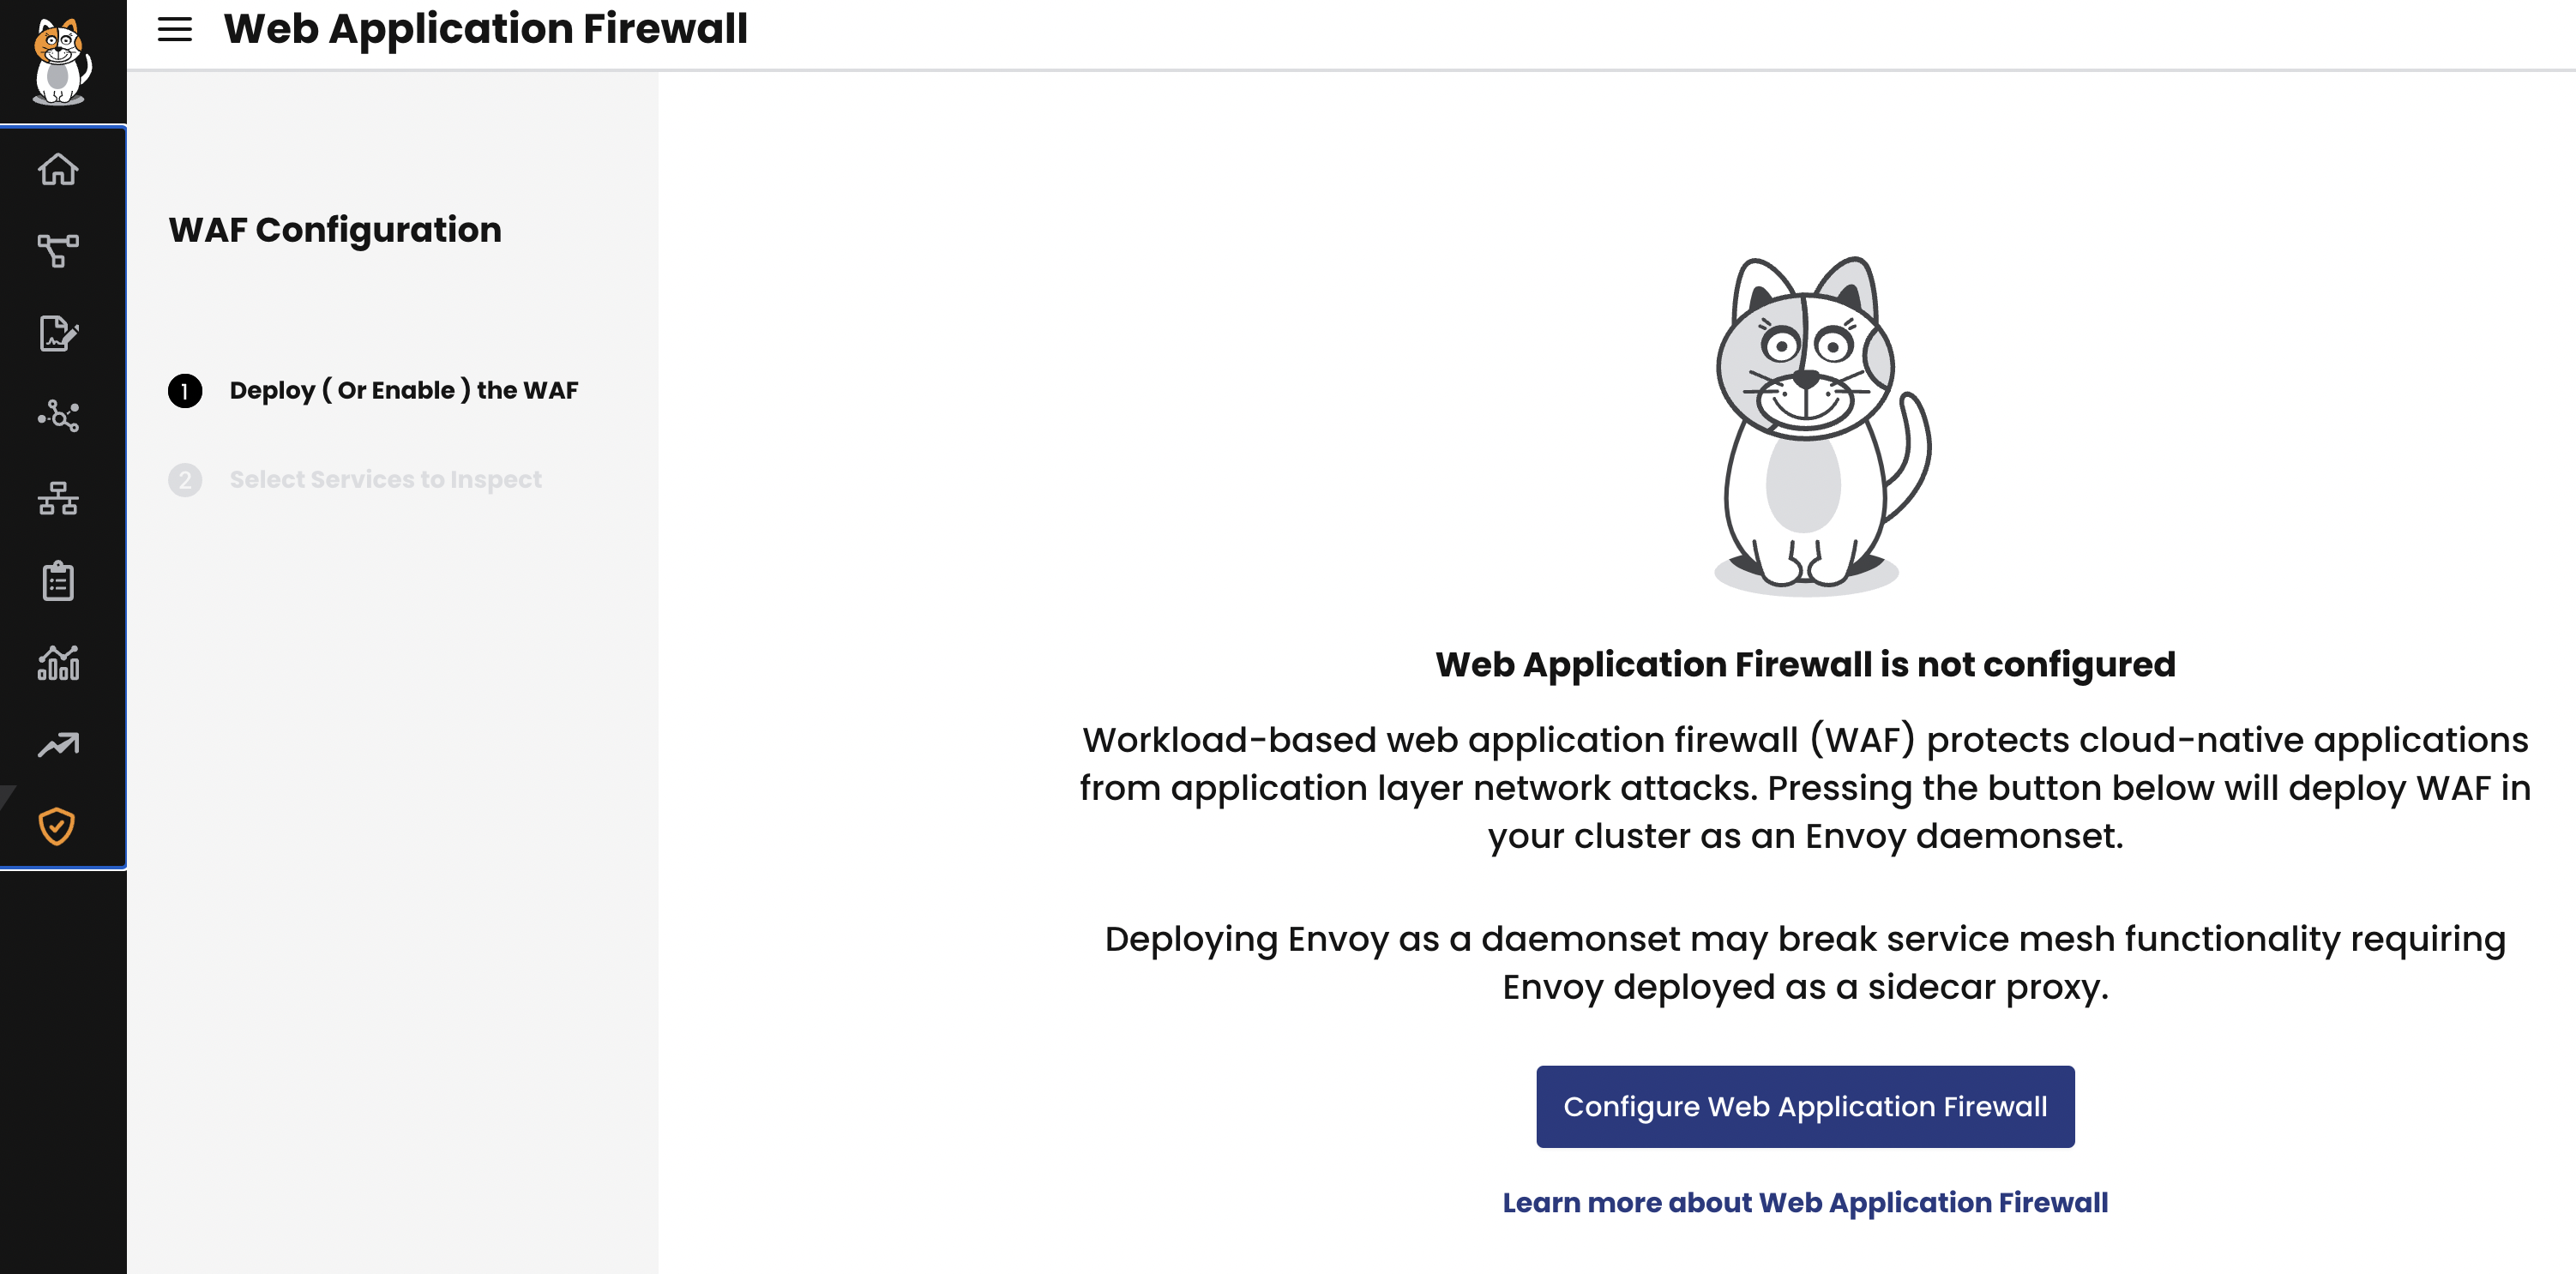
If WAF is already enabled in your cluster, you do not see this page.
Enable WAF using kubectl CLIs
In the ApplicationLayer custom resource, named tigera-secure, set the webApplicationFirewall field to Enabled.
kubectl apply -f - <<EOF
apiVersion: operator.tigera.io/v1
kind: ApplicationLayer
metadata:
  name: tigera-secure
spec:
  webApplicationFirewall: Enabled
EOF
Apply WAF
Now that your cluster is enabled for WAF, you can apply WAF to your services and make sure that your Web apps are protected from application layer attacks.
If you have deployed the sample application, you can apply WAF on a service associated with your app, as follows:
kubectl annotate svc frontend -n default --overwrite projectcalico.org/l7-logging=true
Alternatively, you can use the Manager UI to apply WAF to the frontend service.
In this example, we applied WAF to the frontend service. This means that every traffic that goes through the frontend service is inspected.
However, the traffic is not blocked because the WAF rule is set to DetectionOnly by default.
When you are convinced that the traffic for the service to be denied or dropped, you can set it to block.
Apply WAF to your services
In the previous example, we applied WAF to the frontend service of the sample application. Here, we are
applying WAF to a service of your own application.
On the Manager UI, click Threat Defense, Web Application Firewall.
Select the services you want WAF to inspect, and then click Confirm Selections.
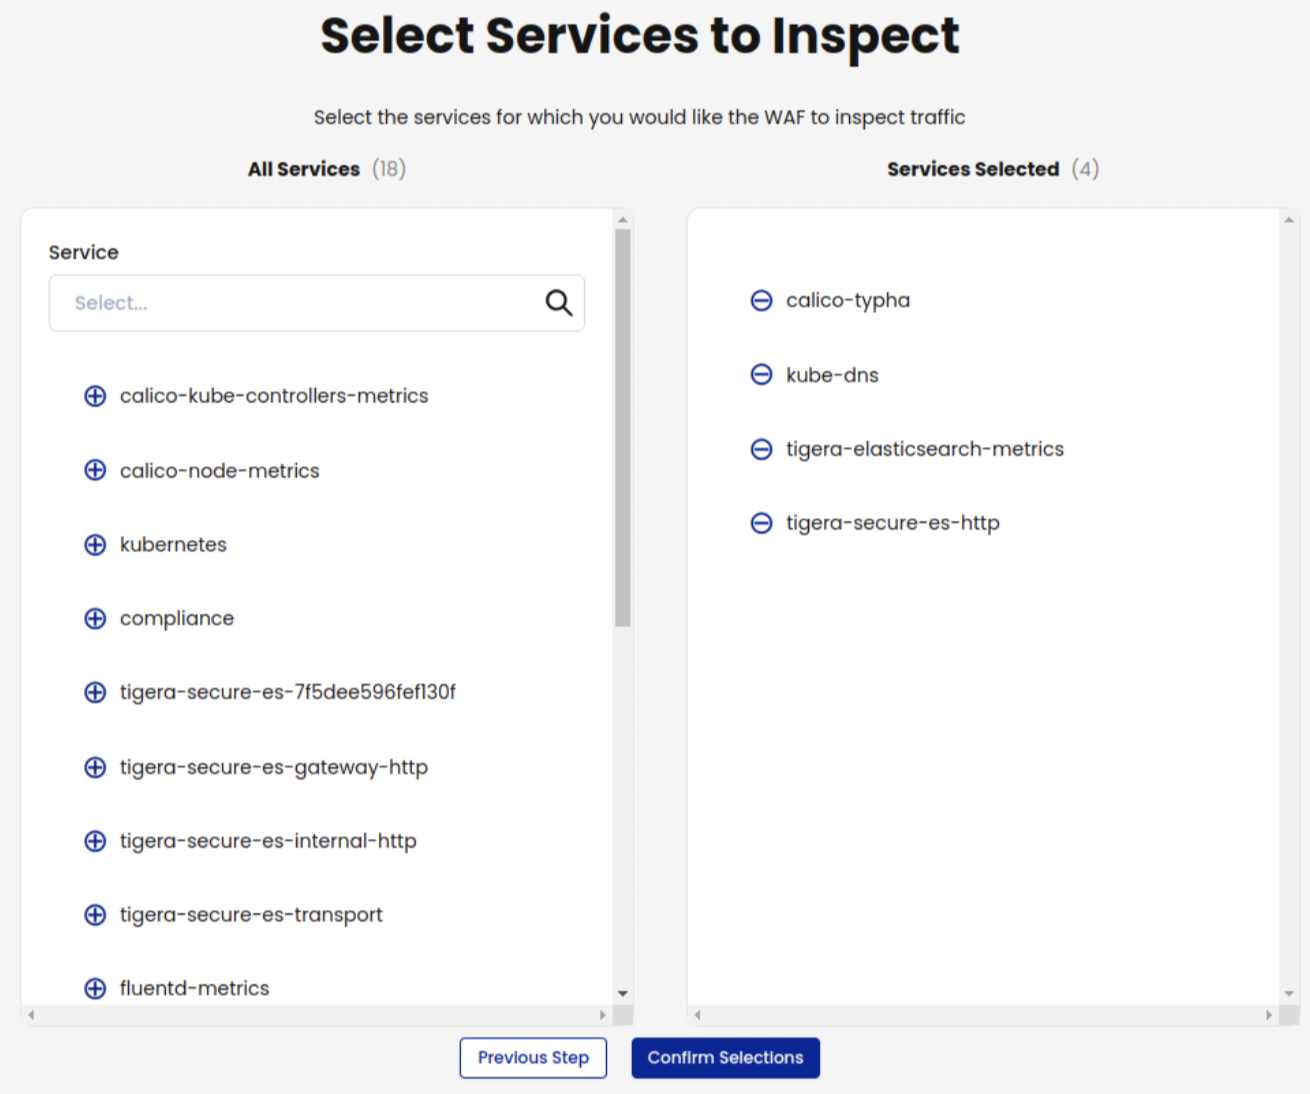
On the Web Application Firewall page, you can verify that WAF is enabled for a service by locating the service and checking that the Status column says Enabled.
To make further changes to a service, click Actions, and then Enable or Disable.
You have now applied WAF rule sets to your own services, and note that the traffic that goes through the selected services will be alerted but not blocked by default.
Set WAF rule to block traffic
You can change WAF rule so that the traffic is blocked.
- Edit the configmap:
kubectl edit cm -n tigera-operator modsecurity-ruleset - Look for
SecRuleEngine DetectionOnlyand change it toSecRuleEngine On.
| Action | Description | Disruptive? |
|---|---|---|
| DetectionOnly | Traffic is not denied nor dropped. Calico Enterprise will log events. | No |
| On | Denies HTTP traffic. Calico Enterprise will log the event in Elasticsearch. | Yes |
| Off | Be cautious about using this option. Traffic is not denied nor alerted. | No |
Manage your rule sets
The default rule sets work fine for most deployments. However, you can customize them to suit your requirements.
By default, Calico Enterprise ships with Core Rule Set v3.3.5 with the following setup files pre-loaded:
To start creating your rules, it is recommended that you download the files (all three) and create your modifications from there, as follows:
Clone our operator code which contains the ConfigMap source.
git clone -depth=1 https://github.com/tigera/operatorChange directory into the actual modsec rule set files we use.
cd pkg/render/applicationlayer/modsec-core-rulesetCreate a ConfigMap.
kubectl create cm --dry-run=client --from-file=. -o yaml -n tigera-operator modsecurity-ruleset > $HOME/my-tigera-waf-ruleset.yamlApply the ConfigMap to your cluster.
kubectl replace -f $HOME/my-tigera-waf-ruleset.yaml
After you do these steps, the modsecurity-ruleset ConfigMap will be replaced in the tigera-operator namespace,
which then triggers a rolling restart of your L7 pods. This means that the HTTP connections going through L7 pods at the time of pod termination will be (RST) reset.
It is important to adhere to the Core Rule Set documentation on how to edit the behaviour of your WAF. A good place to begin at is the Installing Core Rule Set.
In many scenarios, the default example CRS configuration will be a good enough starting point. It is recommended to review the example configuration file before you deploy it to make sure it’s right for your environment.
View WAF events
Service Graph
To view WAF events in Service Graph,
- Select a service.
- Click the HTTP tab.
To simulate an attack to view the default warning in Service Graph, follow these steps:
- Get the cluster/service URL.
- The external address of your cluster/service
- The cluster IP of your application's service (if testing within the cluster)
- Enter the following command to trigger a SQL injection attack.
Example: SQL Injection attack
curl http://my.loadbalancer.address/cart?artist=0+div+1+union%23foo*%2F*bar%0D%0Aselect%23foo%0D%0A1%2C2%2Ccurrent_user
In Service Graph, go to the service and click the HTTP tab. You will see the following warning:
level=warning msg="WAF Process Http Request [2f435aca-4a3e-4f96-a7b2-a60c9745bd7b] URL '/test/artists.php?artist=0+div+1+union%23foo*%2F*bar%0D%0Aselect%23foo%0D%0A1%2C2%2Ccurrent_user' OWASP Warning'[2] Host:'10.224.0.38' File:'/etc/modsecurity-ruleset/REQUEST-942-APPLICATION-ATTACK-SQLI.conf' Line:'45' ID:'942100' Data:'' Severity:'0' Version:'OWASP_CRS/3.3.2' Message:'Warning. detected SQLi using libinjection.''"
Kibana
To view WAF events In Kibana, select the tigera_secure_ee_waf* index pattern.
Create global alerts
To get notifications on WAF events, create Global Alerts.
The following example creates a Global Alert for a SQL Injection attack. Specifically, for Rule ID 942100 Core Rule Set file that will "deny" all traffic instead of "block" traffic.
apiVersion: projectcalico.org/v3
kind: GlobalAlert
metadata:
  name: waf-new-alert-rule-info
spec:
  summary: 'WAF new waf-alert-942100'
  description: 'Test WAF Global Alert'
  severity: 1
  dataSet: waf
  period: 1m
  lookback: 1h
  query: '"rule_info" IN {"*942100*"}'
  threshold: 0
  condition: gt
Apply the YAML to your cluster using: kubectl apply -f test-demo-alert.yaml
Now if a SQL Injection attack is detected for rule ID 942100, you will see the global alert in Manager UI, Activity, Alerts.
Disable WAF for a service
To disable WAF on a service, use the Actions menu on the WAF board, or use the following command:
kubectl annotate svc <service-name> -n <service-namespace> projectcalico.org/l7-logging-
Disable WAF feature from your cluster
To disable WAF, update the ApplicationLayer resource to include the webApplicationFirewall field, and ensure it is set to Disabled.
Example:
apiVersion: operator.tigera.io/v1
kind: ApplicationLayer
metadata:
  name: tigera-secure
spec:
  webApplicationFirewall: Disabled